Release Overview
- Technische Redaktion
This page collects all information on all minor releases of yuuvis® RAD Version 7 regarding new features, breaking changes and important update information.
For detailed information on each minor release, please use the navigation on the left-hand side.
Get Ready for the Release
What Is New in yuuvis® RAD 7.0
yuuvis® RAD 7.0 is the newest major version of our rapid application development tool for content-centric applications. It brings several new functions and technical improvements. Here is a brief overview:
- Update of the database drivers
- Update of Elasticsearch
- Update of the client and its libraries to a newer version of Angular
- Optimizations of system maintenance
Technical Improvements
We have updated the current drivers of the supported databases:
- Microsoft® JDBC Driver 8.4.1 for SQL Server 2019 and former versions
- PostgreSQL JDBC Driver 42.2.18 for PostgreSQL 12 and former versions
We have updated the Search Service, Index Service, and Structure Service for the Elasticsearch version 7.9.3. No reindexing is necessary, but your installed Elasticsearch must be updated as well.
We have updated the client including its library to Angular 11. Be aware that you have to update your custom client and adapt your own components as well.
Performance improvement of the BPM-Service due to upgrading the core-service to Java JDK Version 11.0.9.11.
Technical Changes
- The URL for calling yuuvis® RAD client as well as yuuvis® RAD management-studio has changed. See here what to do while updating to version 7.0: How to upgrade to yuuvis RAD 7.0
- Changed body for OperationService.listRunningTasks and OperationService.getRunningTask. The produced JSON schema is available as endpoint documentation (REST-WS).
Changes of Labels
- Some labels were changed due to user feedback.
New Maintenance Features
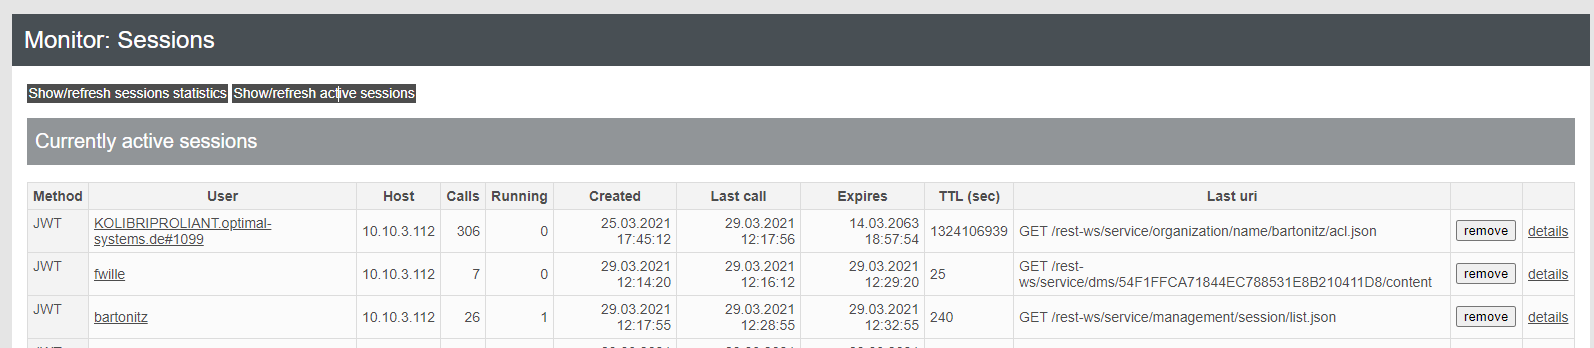
- The session handling is optimized. Current sessions can be monitored on the REST-WS status page. To avoid DOS attacks, the maximum number of sessions for one user can be configured in yuuvis® RAD management-studio.
You can monitor the technical update tasks on the REST-WS status page.
New Features in yuuvis® RAD designer
- A workflow model can be saved with a single click including all changes in all scripts and forms.
New Features in yuuvis® RAD client
- The decimal values in the CSV export for form table data are formatted according to the language the user has set.
- It is possible to format the process variables that are shown in the title and/or description of a business process, in the same manner as for DMS fields in the title of a document. The default formatting for some fields may be changed in comparison to yuuvis® RAD 6.16, so we advise to doublecheck the titles and descriptions of existing models and processes.
- After successfully saving metadata, no notifications are displyed any longer and do not block certain buttons for a short preiod of time.
Deprecated Functions and Removed Features
- With version 6.0 we announced to deprecate the ETL functionality with version 7.0. It is still available for the SAP integration, but the XML file extraction and script execution functionalities have been removed. You have to migrate your import process to a Talend import process.
Notice: If you try to import with your old process, you will see an error stating the "Driver can not be loaded" in the ETL log.
With version 8.0, the entire ETL functionality will be removed because the SAP integration will not rely on ETL anymore. - Binary fields have been deprecated, since it is better to keep binary content as document payload (its content is searchable, can be rendered) of an object, so its use in projects was extremely rare. Projects that use this type will receive a deprecation warning. The field type will be removed with the next major version of yuuvis® RAD.
- The deprecated functional rights "Assign global roles" and "Edit roles related to global domain" have been removed. These rights will be automatically removed from the server during an update to version 7.0. and they will no longer be included in system snapshots created from an updated server. However, they may still exist in older projects located on local filesystems. In case that they are still present and an administrator attempts to activate such schemas, the schema and role set validation will show an error – they must be removed from the rights system prior to activating the schema and role set in a yuuvis® RAD 7.0 system or later (or a snapshot of an already updated system should be taken in order to create a project without these rights).
- BPM Script: the deprecated script property
process.responsiblehas been removed. It had been deprecated with the introduction ofprocess.ownerswhich can also be changed (unlikeprocess.responsiblewhich was read-only). - BPM-Service
- The deprecated optional parameter "maindoc" has been removed in the following endpoints of the bpm-service:
GET api/bpm/process/{processId}/file - get process filePOST /process/{processId}/file/{elementId} - create process filePUT/process/{processId}/file/{elementId} - update element of process filePOST api/bpm/process"-
The following deprecated methods have been removed:
GET /api/bpm/process
- The method GET /api/bpm/processes should be used instead
GET /api/bpm/process/user
- core-service method BpmProcessService.getProcesses should be used instead
- The deprecated optional parameter "maindoc" has been removed in the following endpoints of the bpm-service:
- Core-Service
The
locationinfoparameter forDmsService.getItemhas been removed. Use thecontextinfoparameter instead.The
renditionTypeparameter forMediaManagementService.assignBindinghas been removed. This parameter is no longer necessary and has not been handled in previous versions.The
csmetaparameter forResultService.getEsqlResulthas been removed. Use thedatametaparameter instead.The internal endpoint
InterProcessResourceService.getRenditionhas been removed.
Technical Release Notes
The focus of yuuvis® RAD version 7.0 were updates of relevant 3rd party components. Additionally, some new features and changes took place that will be described in this documentation.
yuuvis® RAD designer
While saving a changed workflow model, changes in all scripts and forms are saved as well.
yuuvis® RAD client
CSV export of form tables
The decimal values are formated according to the language the user has set.
If the decimal delimiter is a dot the column separator is a colon.
If the decimal delimiter is a colon the column separator is a semicolon.
Notifiers are reduced
In case of a successful saving of metadata changes, notifiers are no longer shown. This prevents buttons from being blocked for the time the notifier is visible.
Changed labels
- Instead of index data, the more widely known term metadata is used (in yuuvis® RAD management-studio as well)
In German: 'Indexaten' → 'Metadaten' - We received the feedback that the label 'Context folder' is confusing, so we decided to remove the label Context and use Folder instead.
In German: 'Kontextordner' → 'Ordner' - The button labels of the drop-zone for creating new documents with a file are optimized.
The first button shows the folder type the new object should be filed in.
The second button shows the selected element of the folder structure. We removed the term 'selected tree item'.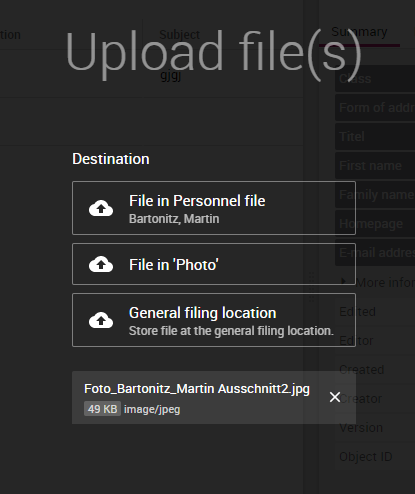
yuuvis® RAD agent 6.3.1
While initiating the sending of a specific e-mail via a custom action the bcc address can be set as well.
yuuvis® RAD management-studio
In the system settings, it is possible to set for the core service at how many sessions per user no further session will be accepted so that 'OutofMemory' can be avoided. Default is 1000.
If this number of sessions is reached, the core-service API throws error code 429 (Too Many Requests).
REST-WS Interface
- The technical update operation tasks can be monitored on the Monitor page.
- It is possible to remove an active session on the Monitor page as well.
Digests
Version 7.6
yuuvis® RAD repository-manager 4
yuuvis® RAD repository-manager has been renewed and extended. It covers the SAP-archivelink-interface as it did earlier. Additionally, it covers the SAP-ILM-interface. Please note that ILM requires a separate license which needs to be bought.
The version completely replaces the former implementation. This means that uninstalling any older version is necessary before installing the new version incase of an update. The KGS configuration inside yuuvis® RAD repository-manager needs to be done from scratch, because yuuvis® RAD repository-manager now contains the current version of KGS content manager.
There is no need to adapt the configuration in SAP, update the data model for archive link or migrate data.
Fuzzy Search (Search Service)
Beginning with this version, it is possible to enable a fuzzy logic in the the search service. This allows users to mistype their search terms and still find what they were looking for. However, activating this feature has the following consequences:
- The fuzzy search will find more relevant objects.
- The performance will decrease slightly.
- The standard search will find objects for more than one term, i.e., search strings such as "term1 term2", where term1 is in the metadata and term2 in the content, or where term1 is in one field and term2 in another. The fuzzy search will only find objects where both terms are in the same field.
- Terms like e-mail addresses cannot be found if they are separated by a colon.
Please refer to the documentation on how to configure the fuzzy search: https://help.optimal-systems.com/yuuvisRAD/v70/admin/de/administration/installation/inst_tsk_elasticsearch.htm?Highlight=fuzzy
Retention Management
The retention management has been extended by the following features:
yuuvis® RAD management-studio
- You can schedule operations to delete objects, e.g., objects that have reached their retention date, by configuring an ESQL statement.
- All available operations are listed in the clean-up history instead of only those that have been carreid out. This way, it is possible to also schedule the clean-up of operations for those that have not been used yet.
- The report of the object deletion operation shows a detailed error message as well.
yuuvis® RAD client
When trying to delete an object set for retention, a confirmation dialog will appear informing about the active action. This dialog does not contain a Delete button.
Custom Client Development
The BPM process file can be forced to be refreshed using an event trigger. Use case: In the Inbox, a user clicks a custom or plug-in object action that adds new objects to the process file and forces the process file list to show the new objects as well.
Documentation for Developers
The localization of history endpoints is possible via the backend. By default, the history endpoints are delivered in English and German. If you need translations for other languages in your own client, you may use the keys of the history events. A list of those keys can be found in the REST-WS endpoint getAuditItem.
Version 7.8
yuuvis® RAD repository-manager
After starting the repositorymanager service, the object definition can be found in the workdir (per default <servicemanager-data>\rm).
Blocking User Accounts Temporarily
Administrators can configure the maximum number of login attempts as well as the timeout for blocking the account in the system view of yuuvis® management-studio. If the time is set to -1, the user will be blocked until an administrator unblocks the account.
The blocking status of a user can be checked in the organization view. The account can be unblocked here as well:

In addition, the REST-WS Sessions Monitor has been extended. The number of temporarily blocked accounts is shown here as well.
In case a login to yuuvis® RAD was not successful, the user will receive a corresponding error message on the login page, informing about a possible blocking of the account.
Documentation for Developers
In the REST-WS interface, developers can obtain a list of all possible error codes including a short description. This data can be copied for translation purposes if needed.
To do so, open the new list of errors via the hompage of the REST-WS interface. The URL follows the following pattern: http://myDomain:8080/rest-ws/#PAGE:error_codes
Version 7.10
yuuvis® RAD repository-manager
After starting repositorymanager service, the object definition can be found in the workdir (per default <servicemanager-data>\rm).
Blocking User Accounts Temporarily
Administrators can configure the maximum number of login attempts as well as the timeout for blocking the account in the system view of yuuvis® management-studio. If the time is set to -1, the user will be blocked until an administrator unblocks the account.
The blocking status of a user can be checked in the organization view. The account can be unblocked here as well:

In addition, the REST-WS Sessions Monitor has been extended. The number of temporarily blocked accounts is shown here as well.
In case a login to yuuvis® RAD was not successful, the user will receive a corresponding error message on the login page, informing about a possible blocking of the account.
Documentation for Developers
In the REST-WS interface, developers can obtain a list of all possible error codes including a short description. This data can be copied for translation purposes if needed.
To do so, open the new list of errors via the hompage of the REST-WS interface. The URL follows the following pattern: http://myDomain:8080/rest-ws/#PAGE:error_codes
Localization of Server-Side Messages
Administrators can have client's the language files translated into other languages than the default ones, which are English and German. However, some messages have not been part of these language files in the past. These messages are part of the history of objects and processes, and were handled as server-side resources. We have now added new keys to the client's language files that include these server-side messages. This way it is possible to also have them translated into any desired language.
Version 7.12
Core-Service Security
The initial core service setup writes the database password as encrypted into the configuration file and the consuming services decrypt it.
You do not have to encrypt your password when updating. However, you are able to encrypt it using an additional tool, see Necessary Actions When Updating or Upgrading to 7.12.
Searchservice
The scoring is optimized for non-system parameters: the fields configured for scoring are higher rated than content.
yuuvis® RAD client
Searching for Table Cells with no Values
It is now possible to search for table cells that do not have values. This can be done just like for regular fields by clicking on the field label. In case of a table cell the tableform has to be opened before. After closing the form, the corresponding table column is flagged accordingly.
Connecting yuuvis® RAD agent
As an administrator, you can configure the setting for the use of yuuvis® RAD agent. If this configuration is set, users are no able to configure the setting themselves. The following options are available:
- Disallow or force the connection to yuuvis® RAD agent
- Set locking behavior if the connection is forced
Please refer to our documentation for detailed information..
Filtering in the Create Object Dialog
In the Create object dialog, a filter has been added to quickly find the correct object type, in case the list of availble object types is very long.
yuuvis® RAD repository-manager
The installation of yuuvis® RAD repository-manager is part of the installation or update of yuuvis® RAD service-manager.
There is no need to adapt the configuration on SAP side. However, make sure the the port and context are correct. Default values are 8010 and /cs respectively.
Version 7.14
System
The system can be set up with a different context path (base href). This way it can be used in, e.g., a portal environment.
yuuvis® RAD client
Full-text Search
The search dialog has been extended with an additional setting for full-text search. It is now possible to either search only in document files or in metadata. The default is as it was: search in document files and metadata.
To support this feature, the search API has been extended as well.
Inbox
If more than one filter term is used to reduce the list of tasks, the terms are combined with an AND operator. This means that both terms have to either be found in the title or the subject.
yuuvis® RAD agent
yuuvis® RAD agent can be used in an OAuth2 environment.
yuuvis® RAD repository-manager
Security issue: The password for the technical user who connects to the backend can be held encrypted in the configuration file.
Version 7.16 LTS
Addendum
The potential security issue that was reported for the Postgres database under CVE-2022-21724 is fixed by updating the JDBC driver to version 42.3.3 for core-service and service manager (bpm-service / inbox-service) 7.16.17.
Extraction
The extraction-service supports invoices in PDF format. This includes the XML file based on the ZUGFeRD version 2.1.1 format (similar to ZUGFeRD version 1.x).
Breaking Change
We have corrected a typo in the properties. Some properties contained the wrong spelling 'aggreement'. In the future, it will be correctly spelled as 'agreement'.
Action: If you have used a property of the old form for mapping, you need to adapt your mapping.
Infrastructure
Context Path
When installing the system, a customized context path can be defined which deviates from the standard, and under which the services will be available.
For example, the URL for the client can look like this: https://mydomain/myContextPath/app/client/
Authentication via OAuth2
The system supports OAuth2 as an authentication method. You need Keycloak as a proxy for LDAP-based Identity Providers that maintain the common user data. Nevertheless, the users of this LDAP system must be synchronized with yuuvis® RAD.
yuuvis® RAD agent, which connects the client with Windows applications, has been adapted as well to support OAuth2.
Sharing Objects
The endpoint that allows to share folders and objects has been adapted. Now you can define whether all children of a folder should be shared or not. The current default is to share all objects assigned to the folder. In specific circumstances, you may not want to share them all.
Upcoming Update of the Workflow Scripting Engine
Starting with version 8, our workflow engine will switch from the Nashorn Script engine to the newer GraalVM engine. The new engine brings full support for the ECMAScript2 specification.
Since the Nashorn engine pre-dates the ECMAScript21, we recommend to test existing worfklow models prior to upgrading to version 8, and if necessary, the syntax of scripts to be updated to the new standard.
This is to be executed only in development/test systems as a preparation for migration to yuuvis® RAD 8, since GraalVM is not yet officially supported in yuuvis® RAD 7.16 LTS and should not be used in productive systems.
In order to test the new script engine, the core-service has to be started with the following parameter:
-Dcom.os.ecm.workflow.scriptEngineType=GraalVM
The Nashorn engine is used, regardless of the core-service having been started with the -Dcom.os.ecm.workflow.scriptEngineType=Nashorn or without it.
Deprecated Methods in $.http in Workflow Scripts
Until version 7.16 LTS, $.http has been giving access to the singleton class HttpClient. On this singleton, an HTTP request could be configured and executed. As HttpClient is implemented as a singleton, all functions of this class are modifying the very same HTTP request. This semantic is error-prone because configurations of sequential HTTP requests could easily get mixed up unintendedly.
To improve this, the new HttpRequest class has been introduced. Instances of this class allow configuration and execution of HTTP requests. Multiple instances of HttpRequest can be created using functions like get() or post() of the HttpClient singleton.
- The following methods in the
HttpClientclass (accessible by the$.httpobject) are deprecated:service()path()raw()header()param()query()body()clear()execute()
- Starting with version 7.16 LTS the
HttpRequestclass is introduced in workflow scripting.- Instances of
HttpRequestcan be created using these functions of the$.httpobject:get(),post,put,delete,patch. - Instances of
HttpRequestoffer the following methods that are deprecated onHttpClient, such asservice(),path(),body(), etc.
- Instances of
Both approaches are supported in version 7.16 LTS
- It is recommended to use the new class to configure and execute HTTP requests from version 7.16 LTS on
- Starting with version 8.0 and later, this will be the only supported approach
HttpClient example (prior to 7.16 LTS)
this.$.http.get();
this.$.http.path("/service/organization/role/{id}").param("id", roleId); //This configures the http singleton. These methods on $.http are deprecated for removal in 8.0
var response = this.$.http.query("orgobjects", true).execute(); // This executes the singleton HttpClass.
HttpRequest example (from 7.16 LTS onwards)
var getRequest =this.$.http.get(); //This creates a new request instance.
var response = getRequest.path("/service/organization/role/{id}").param("id", roleId).query("orgobjects", true).execute(); //Configuration is executed on the getRequest object, no longer on the $.http singleton
//The methods for request instance configuration can be safely used in 7.16 LTS and onwards.
Changes in the Response Format of BpmProcessService.getDataFields due to a Bugfix
Due to a bugfix (ERA-8384 - Model datafields of type List<ID> are returned in wrong format), the format of the response body of the BpmProcessService.getDataFields endpoint changed.
Up to version 7.14, the service delivered the IDs in the wrong format (for instance "l_workflowFileIds.item: OsId[id=97DC54B56A844F9EBB198935476F15B5]"), so the response format has been corrected (for the same example, the response would be "l_workflowFileIds.item: 97DC54B56A844F9EBB198935476F15B5").
Custom microservices that use this endpoint need to adapt to this change before updating to version 7.16.
Important Update Information
Necessary Actions When Updating/Upgrading
This page describes the actions that you must manually execute when updating from version 6.x to a newer version. It also lists things that you must pay special attention to. An update to a new version that skips some of the previous versions is possible and does not require updating to each version in between. However, in this case, you must carry out all the actions from your previous version to the target version in the order listed here.
6.16 --> 7.0
- Manual steps are mandatory. See How to upgrade to yuuvis RAD 7.0 for a step-by-step guide.
7.10 --> 7.12
- The new repository manager 4 (replacement for the ERM but ERM is still available) is added to the service-manager as a microservice. Further information can be found at https://help.optimal-systems.com/yuuvisRAD/v70/sap/de/index.htm
To complete the installation: - Edit the file <service-manager>\config\servicewatcher-sw.yml
Add the following section:
- name: repositorymanager
type: microservice
profiles: prod,cloud,mq
instances: 0
arch: x64
memory: 768M
port: 8010
path: "${appBase}/repositorymanager/repositorymanager-app.jar"- To use the new microservice, set the instances property to 1, else leave it at 0.
- The new repository manager 4 (replacement for the ERM but ERM is still available) is added to the service-manager as a microservice. Further information can be found at https://help.optimal-systems.com/yuuvisRAD/v70/sap/de/index.htm
7.12 --> 7.14
- It is now possible to encrypt all passwords stored in the configuration files of the service-manager. For fresh installations the setup will do the encryption by default, for existing installations follow the below steps to encrypt the passwords.
The encryption is optional and doesn't have to be done.- Open a command prompt (cmd.exe) and navigate to the folder <service-manager>\tools
- Copy the plaintext password you want to encrypt
- Execute "encode.bat <plaintext_password>" (without < >)
Replace the plaintext password in the configuration file with the return value of the form ENC(<characters>) (do not omit ENC( ))
The encrypted passwords can not manually be decrypted anymore. Note the plaintext passwords at a safe location before overwriting them.
Repeat these steps for all passwords you want to encrypt. The following configuration files support encryption: archive-prod.yml, application-dbs.yml, application-es.yml, application-red.yml, erm-prod.yml, gateway-prod.yml, repositorymanager-prod.yml, servicewatcher-sw.yml
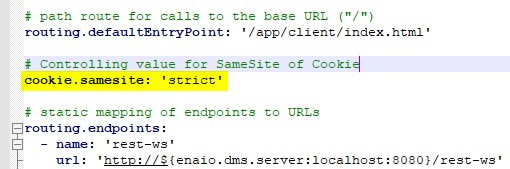
- The gateway can now optionally set the samesite cookie policy level as described here: https://blog.chromium.org/2019/10/developers-get-ready-for-new.html. To define it do the following:
- Edit the file <service-manager>\config\gateway-prod.yml
- Add a new line with "cookie.samesite: '<level>' " → replace <level> with your desired policy level. It can be one of 'none', 'lax' or 'strict'.
- It should now look like this:
- It is now possible to encrypt all passwords stored in the configuration files of the service-manager. For fresh installations the setup will do the encryption by default, for existing installations follow the below steps to encrypt the passwords.
7.14 --> 7.16
- The gateways behaviour when calling the /logout endpoint has changed from always answering with http code 304 and redirecting to /login?logout to now return http code 200 or 304 and redirection to a passed url if and only if this was passed with the 'redir' query parameter.
- Behaviour before:
- call to /logout (without parameter): HTTP 304 with redirection to /login?logout
- call to /logout?redir=url: HTTP 304 with redirection to url (url can be any value)
- Behaviour now:
- call to /logout (without parameter): HTTP 200 (no redirection)
- call to /logout?redir=url: HTTP 304 with redirection to url (url can be any value)
- This is especially important if you have an external tool that creates sessions by sending the basic auth header and you want to close this session by calling /logout. With the before behaviour the http client would get redirected to the login page and automatically create a new session because the basic auth header is existent. This could be avoided by setting the redir parameter to (e.g.) '/auth/info/'. This is not necessary anymore.
Custom clients
Custom clients need to make sure that when calling logout you set the redir parameter to redirect to the login-form again. Otherwise the session gets logged out but the client still shows the current page (or an error).
- Behaviour before:
- Oracle databases only: The NLS_TERRITORY session setting must be configured to 'AMERICA' in order for date/time values to be processed correctly. To make sure this is the case, do the following:
- Edit the file <core-service>\standalone\configuration\standalone-full-ha.xml.
- Find the subsystem 'datasources:5.0' and there the datasource with jndi-name="java:/JASDB".
- Within this section find (or if necessary create) the following line:
<new-connection-sql>ALTER SESSION SET current_schema=yuuvis</new-connection-sql> (yuuvis is a placeholder for the actual schema name) - Add the parameter nls_territory='AMERICA' after "current_schema=yuuvis".
- The section should now look as shown below:

Metrics-Manager only: Due to CVE-2021-44228 (a.k.a Log4Shell) and CVE-2021-44832 the metrics-manager needs to be updated to the newest hotfix. Please see https://help.optimal-systems.com/rw/en/index.html for details.
- The format of the response body of the
BpmProcessService.getDataFieldsendpoint changed from the examplary value "l_workflowFileIds.item: OsId[id=97DC54B56A844F9EBB198935476F15B5]" to "l_workflowFileIds.item: 97DC54B56A844F9EBB198935476F15B5".
Custom microservices that use this endpoint need to adapt to this change before updating to version 7.16.
- The gateways behaviour when calling the /logout endpoint has changed from always answering with http code 304 and redirecting to /login?logout to now return http code 200 or 304 and redirection to a passed url if and only if this was passed with the 'redir' query parameter.
Installation Guide
This guide describes how to install and configure a complete yuuvis® RAD 7.x system.
Where to Find the Installers
The official installers for the yuuvis® RAD 7.x release can be found in the OS cloud URL listed in the release e-mail.
Installation Process
Requirements
Also see the System Requirements (German version here).
- Microsoft SQL or PostgreSQL database server in one of the versions specified in the System Requirements (German version here).
- An exclusive database instance for yuuvis® RAD.
- The default language of the yuuvis® RAD DB user must be set to English.
- The user must be a local database server user. yuuvis® RAD does not currently support logging in the db with a domain user.
- The user must have "db_owner" (or equivalent) rights on the yuuvis® RAD database instance.
- The installation on a Microsoft SQL Server High Availability cluster is only possible by removing the yuuvis® RAD database from the cluster for the duration of the installation, then integrating it back into the cluster afterwards. This can be done while the cluster is online. Later updates of yuuvis® RAD do not require this process.
- The starting size and "extend by" size of the data and log files should suit your needs.
- If the log file size is limited, the recovery model must be set to "simple".
- The server host names must conform with RFC 952. Specifically, they must not contain underscores ( _ ).
- The IP- and MAC-addresses must be static and cannot be changed.
- Firewall exceptions and/or proxy configurations/exceptions for all ports named in the System Requirements or configured differently to the setup's standard.
- Anti-virus exceptions for all folders used by yuuvis® RAD components.
- Microsoft .NET Framework version 4.6.2 for yuuvis® RAD designer.
- An evergreen browser (Chrome, Firefox, Edge) in the current version for the webclient.
- Microsoft Office in one of the versions specified in the System Requirements to run Office Add-In, Outlook Add-in (archiving) and yuuvis® RAD template-editor.
- We also recommend installing Notepad++, Baretail, and 7-Zip.
core-service
- Start the setup by double-clicking, or, if you need to modify preset parameters, open an administrative command line and enter the setup command with the desired parameters.
- Follow the dialogs in the setup.
- Under the heading "Create database structure and base configuration":
- Choose "yes" if you are doing a fresh install and the database is created but empty. This is the default.
- Choose "no" if you already have an existing yuuvis® RAD database. This is the case if you are upgrading from a yuuvis® RAD 5.x installation or for example in disaster recovery situations.
- If you chose "yes":
- Under the heading “Enter E-Mail Parameters" you may leave the parameters empty and enter them at a later time in yuuvis® RAD management-studio.
- The data directory will contain the WORK/CACHE/ARCHIVE area. You can configure the archive area separately after the setup (media management in yuuvis® RAD management studio).
- Under the sidecar service URL, instead of localhost, you must enter the IP of the server hosting the service-manager. It doesn't matter whether or not the address or the dms-sidecar microservice can already be accessed.
- Note the systemuser API key. You will need to enter it during the service-manager setup.
- Start the installation.
- Immediately initialize the database. (This is only shown if you chose "yes" in the "Create database structure and base configuration" step)
- Do not start the service yet.
- If the database is an Oracle database:
By default, the oracle schema name is equal to the upper case user name and this is used automatically.
If you have the case / the requirement, that the schema name is different from the upper case user name, please configure it as follows:- Open the file <core-service>\standalone\configuration\standalone-full-ha.yml
- Naviagte to the line "<subsystem xmlns="urn:jboss:domain:datasources:5.0">" and there to "<datasource jndi-name="java:/JASDB"..."
- Within this section, add the following new line under the line beginning with "<connection-property": <new-connection-sql>ALTER SESSION SET current_schema=schemaname</new-connection-sql>
Replace 'schemaname' with the name of the schema. (Do not use any quotation marks.)
- Modify the data directories (optional) :
- For optimal configuration of the media sets please see: Configuring Media settings for Optimal Harddisk and Inode Usage
- The JBoss data and temp directories can be configured using the JVM-options jboss.server.data.dir and jboss.server.temp.dir.
- WORK / CACHE / ARCHIVE can be configured in the management-studio (menu entry Media) after the core-service and the service-manager have successfully started.
- Modify the log directory (optional) :
- In the directory <core-service>\bin, run the yuuvis_rad_core-servicew.exe file:
- In the Logging tab, change the log path and if desired, change the routing for stdout and stderr.
- In the Java tab, in Java Options, modify the values for -Djboss.server.log.dir and -Dorg.jboss.boot.log.file
- In the directory <core-service>\bin, run the yuuvis_rad_core-servicew.exe file:
- Change the service-user (optional):
- Run the "yuuvis_rad_core-servicew.exe" file in the <server>\bin directory.
- Enter the technical (Windows) user in the "Log On" tab.
- Change the heap-space settings (optional):
- Run the "yuuvis_rad_core-servicew.exe" file in the <server>\bin directory.
- In the "Java" tab, modify the "Maximum memory pool" value to the desired maximum amount of working memory for the core-service (see the System Requirements for recommendations).
- Start the service.
- Check the log file <core-service>\logs\core-service.log with a logging program such as Baretail for the successful start of the service. The service has been successfully started when a large "yuuvis" logo is displayed as ASCII art.
The setup can be run using the command line. Use the --help option to see a list of all available parameters and options.
designer
- Start the setup by double-clicking.
- Follow the dialog boxes in the setup.
- Complete the setup.
- You can configure and manage connections to the core-services in the designer under Settings > Connections.
- Modify the log directory:
- In the root directory of designer, open the logging.nlog.config file in a text editor and modify the value in the following line:
"<variable name="logDirectory" value="${specialfolder:folder=LocalApplicationData}\OPTIMAL_SYSTEMS_GmbH\Logs\enaio designer" />"
- In the root directory of designer, open the logging.nlog.config file in a text editor and modify the value in the following line:
The setup MSI supports the following parameters:
| INSTALLLOCATION | (optional) Target directory for yuuvis® RAD designer in the file system. Default: "C:\Program Files (x86)\OPTIMAL SYSTEMS\yuuvis RAD\designer\v6\" |
Elasticsearch
- Start the setup by double-clicking.
- Follow the setup dialogs.
- Under HTTP-Port, you can configure the port that Elasticsearch will listen on. This port should only be changed if the default port (9200) is already being used. For more details see below.
- The index directory is the directory where Elasticsearch will put its index (database) files. This directory can become very large. We recommend to use SSD storage for this directory.
- When asked for the maximum memory, configure the amount of heap space that Elasticsearch can use. This should be between 4 and 31.5 GB.
- Start the installation.
- Do not start the service yet.
- Change the http and transport ports (optional unless running 2+ instances on the same machine):
- Edit the <elasticsearch>\config\elasticsearch.yml file
- Change the "http.port:" property to your desired port. Make sure to reflect this change in the <service-manager>\config\application-es.yml configuration file of the service-manager.
- Change the "transport.port" property to your desired port
- Set the repository path (optional, if no cluster is set up):
- Edit the <elasticsearch>\config\elasticsearch.yml file
- Edit the "path.repo:" property and set your desired repository path. Use "/" instead of "\" in the path.
If you want to run Elasticsearch in a cluster, this path needs to be used by all cluster nodes and therefore it needs to be accessible by all cluster nodes.
- Modify the service user (optional):
- Run the "elasticsearch-793-service-x64w.exe" file in the <elasticsearch>\bin directory.
- Enter the technical (Windows) user in the "Log On" tab.
- Change heap space settings (optional):
- Run the "elasticsearch-793-service-x64w.exe" file in the <elasticsearch>\bin directory.
- In the "Java" tab, modify the "Maximum memory pool" value to the desired amount of heap space for the service. Make sure "Initial memory pool" is set to the same value.
- In the "Java options" section adapt the "-Xmx" and "-Xms" settings to the desired amount of heap space.
- Modify the data directory (optional):
- Edit the <elasticsearch>\config\elasticsearch.yml file
- Edit the "path.data:" property and set your desired data path. Use "/" instead of "\" in the path.
- Modify the log directory (optional):
- Run the "elasticsearch-793-service-x64w.exe" file in the <elasticsearch>\bin directory.
- Modify the log directory in the "Logging" tab.
- Edit the file <elasticsearch>\config\elasticsearch.yml
- Add a line with "path.logs: " and the path to your desired logs folder. Use "/" instead of "\" in the path.
- Start the service. (check es-red.log file in the logs folder for correct startup)
- Execute the <elasticsearch>\bin\elasticsearch-set-initial-passwords.bat file
- Copy the password of the 'elastic' user. (Alternatively, you can open the <elasticsearch>\config\built-in.usr file and look it up there.)
- Once the service-manager is installed, open the <service-manager>\config\application-es,yml file and paste the password as the value of the property "elasticsearch.password".
service-manager
- Double-click to start the setup.
- Follow the setup dialogs.
- Under HTTP-Port, you can configure the service-manager services port. This port has no special significance but should only be changed if the default port (7281) is already being used.
- Under "Enter yuuvis® RAD core-service parameter", enter the IP address of the server that hosts the core-service.
Also enter the systemuser API key that you noted during the core-service setup. - Under "Enter database parameter" at "database server" enter the IP address under which the database used for yuuvis® RAD (core-service) can be reached. You may need to modify the port (1433 is generally correct for MSSQL databases).
Also enter the database name of the database used for the yuuvis® RAD (core-service), as well as the credentials of the database user designated for yuuvis® RAD into the corresponding fields. - Under "Enter enaio rendition-plus parameter", enter the IP address and the port of the server that hosts yuuvis® RAD rendition-plus. Rendition-Plus does not yet have to be installed. If a different port is selected during installation of Rendition-Plus, you must enter it instead of the default 8090.
- Under "IP Filter for dms-sidecar", enter the IP addresses and/or IP address ranges that should get access to the dms-sidecar. The dms-sidecar provides access to the core-service REST-WS API and thus access to it should be limited to the necessary servers only. The value is a regex expression, refer to this page for more details.
- Complete the setup but do not start the service yet.
Open the file "<service-manager>\config\application-prod.yml" and add the following line to the end of it: feign.hystrix.enabled: false
Also, change the value of "connection-time-ms" to 60000 and of "socket-timeout-ms" to 300000, to match the following example:feign.hystrix.enabled: falseservice:
connection-timeout-ms: 60000
socket-timeout-ms: 300000If the Elasticsearch installation is on a different machine than the service-manager installation, edit the <service-manager>\config\application-es.yml file and replace the 127.0.0.1 IP with the IP of the Elasticsearch machine in the following lines:
spring.data.elasticsearch.cluster-nodes:'127.0.0.1:9300'spring.elasticsearch.rest.uris: '127.0.0.1:9200'If you are setting up a productive system and expect to have a very high amount of documents (i.e. > 50 Mio. documents) and/or data in elasticsearch (many metadata fields and/or big fulltexts) consider increasing the number of shards from 1 (the default) to a more appropriate one. If you have more than one node in your elasticsearch cluster, use at least the number of nodes as the number of shards. We do not recommend to go higher than 3 or 4 times of the number of nodes as this would rather lower the performance again. See also https://www.elastic.co/guide/en/elasticsearch/reference/current/size-your-shards.html for more details.
To increase the number of shards, edit the file <service-manager>\config\index-prod.yml and add the line shown below. This must be done before the first start of the service-manager (index-service) to take effekt (otherwise a reindex using the index-service's swagger-ui endpoint is necessary).osfts.number-of-shards: 3
If the core-service installation is on a different machine than the service-manager installation, edit the file <service-manager>\config\application-mq.yml and replace the 127.0.0.1 IP with the IP of the service-manager machine in the following lines:
spring.activemq.broker-url: 'tcp://127.0.0.1:61616'spring.activemq.broker-url-stomp: 'stomp://127.0.0.1:61777'If there are multiple service-manager installations on different machines, choose IP of the installation that hosts the messaging-service.
Make sure that the server hosting the core-service can access the messaging-service using this IP (i.e. check firewall rules etc.).If the structure-service and the discovery-service are on different machines and/or the discovery-service is running on a port different than the standard (7261), edit the file <service-manager>\config\servicewatcher-sw.yml and add the "env" parameter with the corresponding values (host and/or port of the discovery-service) to the section of the structure-service as follows:
- name: structureservice
  type: executable
  profiles: prod,red,es,mq
  instances: 1
  port: 7461-7469
  path: ${appBase}/structureservice/structure-service.exe
  env:
    EUREKA_HOST: 10.10.1.2
EUREKA_PORT: 9261- Modify the number of shards for the enaiored (metadata) index (optional):
- The default number of shards for the enaiored index is 1. If you have multiple Elasticsearch nodes and/or several ten millions of objects, you should increase the number of shards (to at least the number of Elasticsearch nodes) for better distribution and performance of the data.
- Open the file <service-manager>\config\index-prod.yml
- Increase the value of the property "osfts.number-of-shards" to the desired shard count.
Change the rollover settings for the logfiles (optional):
Open the file "<service-manager>\config\servicewatcher-sw.yml" and complete the logging section as shown below.
logging:
   file: ./../../logs/services.log
   config: ./config/logback.xml
   maxDays: 15
   totalSizeCap: 3GB
The parameter maxDays determines for how many days a log file should be saved.
The parameter totalSizeCap limits the total size of all log files to the specified value.
- Change the memory assigned to individual microservices (optional):
- In the file <service-manager>\config\servicewatcher-sw.yml, modify the memory allocation and instances for the individual services. Note: If a service is allocated more than 1.5 GB of memory, you must set the parameter "arch: x64" for this service to activate the 64-bit support.
Define gateway authentication method and custom endpoints (optional):
In the "<service-manager>\config\gateway-prod.yml" file, you can adjust the authentication mechanism for the services by setting the "authentication.filter.*" properties as follows:
- Basic-authentication:\ntlm: false, form: true, basic: true
- NTLM (SSO) authentication: ntlm: true, form: false, basic: false
You can also define additional (external) endpoints as follows:
routing.endpoints
- name: 'custom'
- url: 'http://localhost:4321'
- Modify the data directories (optional):
- In the <service-manager>\bin directory, run the enaio_red_service-managerw.exe file.
- In the "Java" tab, under Java Options, set the temp directory with the JVM option Djava.io.tmpdir. You can use the options –Dcatalina.base and –Dcatalina.home to set the Tomcat work directories.
- In the directory <service-manager>\config, open the application-prod.yml file and modify enaio.data.path. The relative path to the .jar files is <service-manager>\apps\<*service>. If you use './../..', you end up in the service-manager root directory.
- Modify the log directory (optional):
- In the <service-manager>\bin directory, run the enaio_red_service-managerw.exe file.
- In the "Logging" tab, modify the log path and, if desired, set up or change the redirects for stdout and stderr.
- In the "Startup" tab, modify the "--logging.file" argument. The relative path to the .jar files is under <service-manager>\apps\<*service>. Use './../..' to point to the service-manager root directory.
- In the <service-manager>\config, open the servicewatcher-sw.yml file and in the "logging" section, modify "file". The relative path to the .jar files is under <service-manager>\apps\<*service>. Use './../..' to point to the service-manager root directory.
- Modify the service user (optional):
- In the <service-manager>\bin directory, run "enaio_red_service-managerw.exe".
- (Optional) In the "Log On" tab, enter the technical (Windows) user.
- Start the service.
- You can see an overview of the running services at http://<ip>:7273. This is the Spring Boot Admin service. It can be used to permanently monitor the services.
- It can take several minutes for all the services to start successfully.
- "Connection refused" exceptions appearing in the service-manager log file in the first few minutes are nothing to worry about.
The setup can be run using the command line. Use the --help option to see a list of all available parameters and options.
rendition-plus
Start the setup by double-clicking.
- Follow the dialogs in the installer.
- The HTTP port determines through which port the rendition-plus service can be contacted. If you deviate from the default 8090, you must modify the service-manager configuration file application-red.yml accordingly.
- In "enaio Rendition sidecar" enter the IP address of the server hosting the service-manager. Important: 127.0.0.1 is only valid if both services are installed on the same machine. If not, you must use the externally visible IP address.
- Complete the setup but do not start the service yet.
In the file <rendition-plus>\webapps\osrenditioncache\WEB-INF\classes\config\config.properties, modify the maximum size of the rendition cache with the cache.maxsize parameter if the preset of 500 GB does not fit your needs. The smaller you make the cache size, the more often existing rendition files are displaced and have to be created again when requested by a call.
- Modify the data directories (optional):
- In the <rendition-plus>\bin directory, run "enaio red rendition-plusw.exe".
- In the "Java" tab, under Java Options, set the temp directory with the JVM option -Djava.io.tmpdir. You can use the options –Dcatalina.base and –Dcatalina.home to set the Tomcat work directories.
- In the file <rendition-plus>\webapps\osrenditioncache\WEB-INF\classes\config\config.properties, you can modify rendition-cache specific data directories.
- To modify the Cache directory, use the sor.root key.
- To modify the Jobs directory, use the job.root key.
- To modify the Temp directory, use the temp-base key.
- To modify the Database-Root directory, use the db.root key.
- In the file <rendition-plus>\webapps\renditionplus\WEB-INF\classes\config\config.properties, you can modify rendition-plus specific data directories.
- The temp directory can be adjusted by the temp-base key.
- Modify the log directory (optional):
- In the <rendition-plus>\bin directory, run "enaio red rendition-plusw.exe".
- In the "Logging" tab, modify the log path and, if desired, set up or change the redirects for stdout and stderr.
- In the <rendition-plus>\conf directory, open the logging.properties file and modify all lines that correspond to a *.directory key. (As a rule, $(catalina.base) corresponds to the rendition-plus root directory.)
- Open the <rendition-plus>\webapps\osrenditioncache\WEB-INF\classes\log4j.properties file in a text editor.
- Modify the log4j.appender.OsRenditionCacheLogFile.File key to change the path of OsRenditionCacheLogFiles.
- Modify the log4j.appender.JobMonitoringLogFile.File key to change the path of JobMonitoringLogFiles.
- Open the <rendition-plus>\webapps\renditionplus\WEB-INF\classes\log4j.properties file and modify the log4j.appender.RenditionPlusLogFile.File key to change the path of RenditionPlusLogFiles.
- Modify the service user (optional):
- In the directory <rendition-plus>\bin, run the "enaio red rendition-plusw.exe" file.
- (Optional) In the "Log On" tab, enter the technical (Windows) user.
- Start the service
- Check the log files for correct startup and/or check the service-manager admin (http://<service-manager-ip>:7273) if the renditionsidecar is available.
The setup can be run using the command line. Use the --help option to see a list of all available parameters and options.
Agent, Office and Outlook Add-Ins, Template-Editor
- Start the MSI Setup by double-clicking it.
- Other than an installation path, the setups need no additional input and complete on their own.
If you are installing the MSIs using the console (e.g. Microsofts software distribution) you can specify the parameter "installdir" to change the default installation path. - Modify the Log Directories:
- The log directories cannot be modified at this time.
- Log files for the add-ins can be found in %LOCALAPPDATA%\OPTIMAL_SYSTEMS_GmbH\Logs, in the corresponding subfolders.
- Log files for the agent can be found in %APPDATA%\enaio red agent\logs.
metrics manager
- Please refer to the metrics-manager Installation Guide.
For security reasons, the passwords for the system accounts should be changed after the installation is complete.