How to Upgrade to yuuvis RAD 9.0
Before you start:
- Make sure you have updated your yuuvis® RAD system to version 8.16 LTS before updating to version 9.x.
- Stop the 8.16 core-service.
Stop the 8.16 service-manager.
- Stop Elasticsearch 7.16.2
- service-manager 8.16 LTS → service-manager 9.0
- After the update of the service-manager, JDK 17 is installed instead of JDK 11. The services are compiled with JDK 11 or 17 but all of them are running with JDK 17.
- Addition of the viewer-microservice
The viewer microservice was added to display different types of content files in yuuvis® RAD client.Open the
<service-manager>\config\gateway-prod.ymlfile (and all other gateway-*.yml files if setup on your own and containing endpoints), and add the following endpoint to the end of the list:- name: 'viewer' url: 'http://viewer'
Thegateway-prod.ymlfile should now look like this: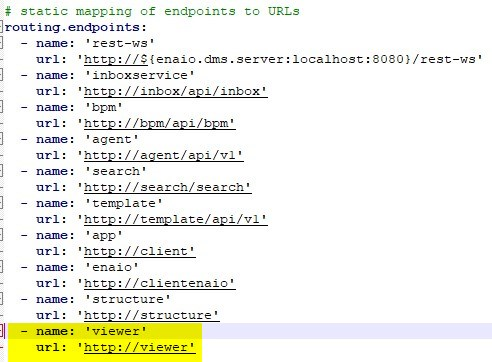
-
- If (one of) the systems gateway(s) uses a self-signed certificate (SSL/HTTPS) the viewer-service must be configured to accept this certificate. To do this, follow the below steps:
- Extract the public certificate in .crt / .cer file format (PEM, Base64 encoded DER with BEGIN and END markers) from the existing .p12 certificate (or the root certificate if there is a certificate chain) - either by using OpenSSL on the command line or by using the Keystore Explorer (with GUI)
Command line:
openssl pkcs12 -in yuuvis.p12 -clcerts -nokeys -out yuuvis.cer
(replace yuuvis with the name of your certificate)
- Keystore Explorer:
- Open the .p12 certificate in the Keystore Explorer
- Double click on the certificate entry to open the details of the certifcate
- Click on the Export button at the bottom left.
- Change the path of the export file to "<service-manager>\certificates" (create the directory if it doesn't exist)
- Click ok to export the .cer file
- Open the file <service-manager>\config\servicewatcher-sw.yml
Navigate to the viewer-service section and add the following parameter at the bottom
env:
    NODE_EXTRA_CA_CERTS: ${appBase}/../certificates/yuuvis.cer
(replace yuuvis with the name or your certificate)
It should now look like this:
- name: viewerservice
  type: executable
  profiles: prod,red
  instances: 1
  port: 7471-7479
  path: ${appBase}/viewerservice/viewer-service.exe
  env:
    NODE_EXTRA_CA_CERTS: ${appBase}/../certificates/yuuvis.cer
- Extract the public certificate in .crt / .cer file format (PEM, Base64 encoded DER with BEGIN and END markers) from the existing .p12 certificate (or the root certificate if there is a certificate chain) - either by using OpenSSL on the command line or by using the Keystore Explorer (with GUI)
[optional]: With the new viewer-service the viewing and handling of e-mails and their attachments has been changed. Until version 10.0, it is possible to configure the old viewing and handling. If this is desired, proceed as follows
Open or create the
<service-manager-data>\webresource\resources\client\assets\_default\config\extend.jsonfile and insert the below preview section.
(The content of the file must be a json object. So if no other content is in the file add"{"as the first line and"}"as the last line.)"preview": { "viewers": [ { "mimeType": ["message/rfc822", "application/vnd.ms-outlook"], "viewer": "() => parameters.defaultViewer + '#'" } ] }
- Only for custom gateway login pages:
- The version numbers of the referenced libraries in the
login.htmlandloggedout.htmlfiles need to be removed, so that the available version is used at all times.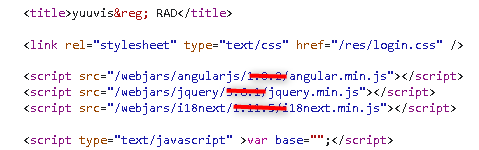
- The files should now look like this:
- login.html
<script>...'/webjars/angularjs/angular.min.js'"></script>
<script>...'/webjars/jquery/jquery.min.js'"></script>
<script>....'/webjars/i18next/i18next.min.js'"></script> - loggedout.html
<script>....'/webjars/jquery/jquery.min.js'"></script>
- The version numbers of the referenced libraries in the
- Context-Path settings
- If using a custom context path, the file <service-manager-data>\webresource\resources\client\assests\_default\confiig\extend.json must be changed to only contain the parameter "contextPath": '/yuuvis' instead of all base addresses - as described here https://help.optimal-systems.com/yuuvisRAD/v90/admin/en/architecture/microservices/mic_tsk_install.htm?Highlight=context%20path
- If using a custom context path, the file <service-manager-data>\webresource\resources\client\assests\_default\confiig\extend.json must be changed to only contain the parameter "contextPath": '/yuuvis' instead of all base addresses - as described here https://help.optimal-systems.com/yuuvisRAD/v90/admin/en/architecture/microservices/mic_tsk_install.htm?Highlight=context%20path
- If (one of) the systems gateway(s) uses a self-signed certificate (SSL/HTTPS) the viewer-service must be configured to accept this certificate. To do this, follow the below steps:
-
- The service-manager 9.x is shipped with Java JDK 17 and therefore all custom microservices need to be compiled with JDK 17 or at least compatible to this version. If a custom microservice uses the (now) forbidden reflections, it can be configured to allow this again:
- Open the
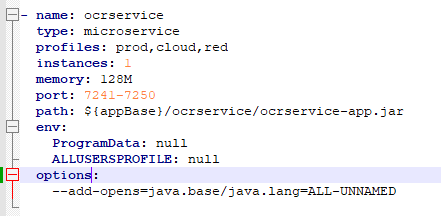
<service-manager>\config\servicewatcher-sw.ymlfile - Navigate to the section defining the custom microservice and add the following lines to define java options passed to the JVM at startup:
options:
--add-opens=java.base/java.lang=ALL-UNNAMED - It should now look like this:
- Open the
- The service-manager 9.x is shipped with Java JDK 17 and therefore all custom microservices need to be compiled with JDK 17 or at least compatible to this version. If a custom microservice uses the (now) forbidden reflections, it can be configured to allow this again:
Elasticsearch 7.16.2 → Elasticsearch 7.17.8
Elasticsearch 7.16.2 needs to be replaced by version 7.17.8. To do this, version 7.16.2 needs to be uninstalled and version 7.17.8 installed and configured as follows:
- Stop the Elasticsearch 7.16.2 service.
- If the data directory is located inside the installation path of Elasticsearch 7.16.2, move it outside and/or make a backup.
- Backup the
<elasticsearch>\config\elasticsearch.ymland<elasticsearch>\config\built-in.usrfiles. - Uninstall Elasticsearch 7.16.2.
- Install Elasticsearch 7.17.8 as described here: Installation Guide Version 9.0
- Before you start the service:
- Transfer custom settings from the backed-up
elasticsearch.ymlfile to the newly installed file. - Copy/move the backed-up
built-in.usrfile to the new<elasticsearch>\configfolder. - If needed, move the data directory to the desired location.
- Make sure the
path.dataproperty points to the (moved) data directory of Elasticsearch 7.17.8.
- Transfer custom settings from the backed-up
- Start the service and check that the cluster state is green and contains the yuuvis® RAD indices.
- Core-Service 8.16 LTS → Core-Service 9.0
- Only for Systems with Oracle-Database:
- Stop the core-service, if it is not stopped yet.
- Open the service-wrapper interface by double clicking the file <core-service>\bin\yuuvis_rad_core-servicew.exe (pay attention to the 'w' at the end of the filename).
- Switch to the 'Java' Tab
- In the section 'Java options' scroll to the end of the parameter list and append the following two lines:
-Duser.language=en
-Duser.country=US - Do not change 'en' or 'US' to your language / country
- Click ok to save the options and close the interface.
- Only for Systems with Oracle-Database:
- Designer 8 → Designer 9
- The designer requires the Microsoft Edge WebView2 component to be able to display the form preview. If this component is not installed on your machine, please install it. The setup is included in the published setups-folder.
Project (Schema) 8 → Project (Schema) 9
After version 9.0 has been installed, it is necessary that you create a new project file (schema) as a system snapshot in yuuvis® RAD designer and that all following deployments use this project file (schema) as its basis. If you deploy a project file with version 8 or below, you will break the system.
- All clauses in roles that contain the "containsrowwithcondition" function and refer to a multitagging field (i.e. in <= 8.16 a one columned table, in >= 9.0 a Set of any type) need to remove the <tablename>+record type-layer.
For example: The old condition "containsrowwithcondition(orderstablerecord.order = 'order4711')" now has to be "containsrowwithcondition(order = 'order4711')"
- All clauses in roles that contain the "containsrowwithcondition" function and refer to a multitagging field (i.e. in <= 8.16 a one columned table, in >= 9.0 a Set of any type) need to remove the <tablename>+record type-layer.