Authentication against the Core API
- Technische Redaktion
Table of Contents
Introduction
A yuuvis® Momentum user has to be authenticated in order to be authorized to access to whatever resources or functions his role entitles him too. To achieve this, yuuvis® Momentum connects to an identity provider, which may offer Single Sign-On (SSO) functionality. An existing corporate systems environment usually already uses some sort of identity provider. An identity provider is a software managing user accounts and authentication, the classic example being Microsoft® Active Directory® (AD) or OpenLDAP implementations. Using the yuuvis® API authentication service requires an identity provider to handle authentication by providing the endpoints used in the OAuth 2.0 authorization workflows.
Authorization Code Flow
This type of authentication flow is used to authenticate users coming from either browsers or mobile apps. Unauthenticated calls to the yuuvis® API are redirected to the identity provider, where the user authenticates using whatever method the identity provider is configured for. This can be a simple login form, Kerberos, a two- or multi-factor login, or anything else out of the multitude of possibilities. After authentication, the call is routed back to the yuuvis® API in authenticated form.
Password Credentials Flow
In this authentication flow, a client application transmits the users’ credentials together with its own client credentials to the yuuvis® API as the Base64-encoded content of an ‘Authorization’ header. This authentication flow lends itself to backend operations, such as applications migrating data to yuuvis® API.
Device Flow
This flow is intended to support any application that is supposed to work with yuuvis® API but does not have access to a native browser or the identity provider itself to obtain a pair of client credentials. An endpoint designed for this case supplies that kind of application with a user_code, device_code and verification URI which can be called using a remote browser to authenticate at the identity provider and obtain an access token.
All OAuth 2.0 authentication flows end with the client application obtaining an access token representing the users’ credentials that can be used to authenticate at yuuvis® API. They form the basis for all available authentication procedures.
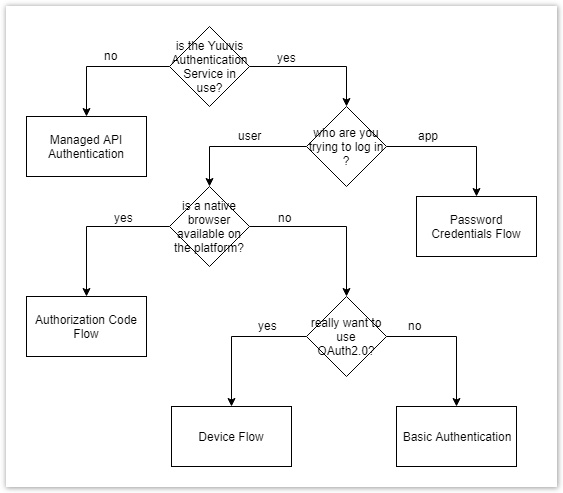
Choosing an Authentication Method
Depending on the circumstances in which your yuuvis® API client application is supposed to authenticate itself, the recommendation toward an authentication method changes. The diagram below shows an example decision process that should be adhered to by developers of yuuvis® API applications.
Authentication with Authorization Code Flow
When using web clients, authentication should be accomplished using the ‘Authorization Code Flow.’ For each tenant known to the identity provider, an authentication URL is created that users of the tenant can use to reach login forms to authenticate with.
Tenant-specific authentication URL: https://<yuuvis-base-url>/oauth/<tenant> (for example https://yuuvis.io/oauth/default for the default tenant)
If an unauthenticated user tries to call any webclient URL other than the tenant-specific authentication URL and fails to supply a Tenant Header, he/she will be redirected to the tenant form of the identity provider. Once the authentication has been completed, all following calls to yuuvis® API URLs will be contextualized using tenant and identity of the user.
For every tenant that’s supposed to support this authentication flow, the properties `clientId`, `clientSecret`, `userAuthorizationUri`, `accessTokenUri`, `userInfoUri` and `userNameExtractionPattern` need to be defined for the authentication service. Optionally, the property ‘endSessionUri’ can be configured to ensure logging out of yuuvis® API also infers a logout at the identity provider.
If the authentication service only defines a single tenant, unauthenticated users may reach the login form of identity provider without naming their tenant.
Authentication with Basic Authentication
For client applications, dealing with the OAuth 2.0 flows can be circumvented by authenticating using basic authentication. Simply send the tenant and credentials of the user in the respective HTTP headers when trying to call any yuuvis® API endpoint. Behind the scenes, the entered credentials will be relayed into the authorization code flow, so the same configuration setup requirements apply.
Required HTTP headers:
- ‘Authorization’: ‘Basic <base64 encoded <username>:<password>>’
- ‘X-ID-TENANT-NAME’:’ <tenant>’
Example headers:
‘Authorization’: ‘Basic dXNlcm5hbWU6cGFzc3dvcmQK’
‘X-ID-Tenant-Name’: ‘default’
Obtaining a Token with Password Credentials Flow
In this flow intended for backend applications, a client application requests an access token from the identity provider directly. However, it requires the client application to be registered at the identity provider, and in turn, the developer of the client application needs administrative access to the identity provider.
The credentials of a user (username, password) and the credentials of the trusted client (client_id, client_secret) together with a grant type flag are delivered to the identity providers’ token URL (i.e. https://<keycloak>/auth/realms/<tenant>/protocol/openid-connect/token) as a text payload with the MimeType ‘application/x-www-form-urlencoded’. The identity provider will respond with a token and a corresponding token type. This token then needs to be delivered to the Identity Provider similar to the user credentials during Basic authentication.
For this authentication flow, the authentication service’ application-oauth2.yml configuration file must contain a configuration of the properties ‘userInfoUri’ and ‘userNameExtractionPattern’ for each tenant. Other tenant-specific configuration properties can be ignored for this flow.
Authentication at the API using an existing access token
For customers that want work with an enriched access token as their method of authentication for their client application, it’s possible to supply a valid access token instead of the credentials. The Password Credentials Flow can be used to obtain the token from the identity provider.
Similar to the credentials-based authentication, the authenticating access token is delivered to the API in the Authorization header.
For this authentication flow, the authentication service must contain a configuration of the properties ‘userInfoUri’ and ‘userNameExtractionPattern’ for each tenant. Other tenant-specific configuration properties can be ignored for this flow.
Required HTTP headers:
- ‘Authorization’: ‘Bearer <access token>>’
- ‘X-ID-TENANT-NAME’:’ <tenant>’
Example headers:
‘Authorization’: ‘Basic dXNlcm5hbWU6cGFzc3dvcmQK’,
‘X-ID-Tenant-Name’: ‘default’
Authentication at the API Using the OAuth 2.0 Device Flow
The OAuth 2.0 device flow serve to authenticate devices without native browsers or the ability to use the regular authentication flows to authenticate their native applications. The yuuvis® API authentication service implements the device flow based on its’ 12th revision (https://tools.ietf.org/html/draft-ietf-oauth-device-flow-12).
Device Flow Process
- The client application calls https://<base_url>/tenant/<tenant>/loginDevice. yuuvis® API responds with ‘device_code’, ‘user_code’ and ‘verification_uri’
- The client application calls https://<base_url>/<verfication_uri>?user_code=<user_code> where ‘verification_uri’ and ‘user_code’ are replaced by the response from step 1. This redirects to the identity provider, where the user authenticates with his credentials. If there is no system browser available to the client application, the user can manually call this URI from any browser on any device.
- The client application starts polling the yuuvis® API authentication service for the status of the authentication at the URL http://<enaio>/auth/info/state?device_code=<device_code>. The polling interval can be derived from the response in step
During the authentication process, the state polling will return the error ‘authorization_pending’ with status 400. The first state poll after a successful authentication returns the access token and the token type with status 200. The two response parts need to be composited in the ‘Authorization’ header like ‘Authorization’: ‘<token_type> <access_token>’ and sent within a final call to any yuuvis® API endpoint, which will authenticate the user using the access token.
Five minutes after their issuance, ‘device_code’ and ‘user_code’ become invalid. Therefore the authentication needs to be completed within that time frame, otherwise the device flow needs to be repeated from the start. A client application can detect the passage of 5 minutes during polling when the verification URI yields the error ‘expired_token’, implying that polling can be stopped. The lifespan of the user and device code can be configured in the authentication service using the property ‘authentication.oauth2.deviceCodeExpiration’, which defines the codes’ TTL.
Authentication Using External Authentication Services
So far, we've detailed the authentication mechanisms available when using the proprietary yuuvis® API authentication service. It is likely that at a later date, most customers will be using yuuvis® API through a managed API gateway, authenticating using a subscription key tied to a platform-specific account (i.e. a Microsoft account for Azure Managed API) instead of user credentials. Since these managed API gateways replace both the Identity Provider and the authentication service, not much can be generally said about the way to authenticate at these external services. If you are using a yuuvis® API build utilizing such a managed API, refer to that API's documentation when trying to authenticate.
Summary
This article gave an overview of the authentication methods supported by yuuvis® Momentums authentication service and their details. For rapid and easy testing or as practical application as an identity management platform, allowing the integration of different distinct identity providers (user federation), keycloak is an excellent tool, its usage being exemplified in one of the tutorials linked below.